By Mark Gahler
Since I began working for the North Temperate Lakes (NTL) LTER site in 2014, I have heard a lot of people express interest in the possibility of building their own environmental sensors using Arduino or Raspberry Pi as the computing core. They are relatively inexpensive, generally $20-$30, and are much easier for non-engineers to work with than the electronics and computers of decades past. A ‘maker culture’ has developed (analogous to hacker culture) where people not formally trained in electronics build and tinker with their own electronics and robotics. The maker culture sustains itself. The purchase of parts creates a supporting economy in hardware, and the contributions of individuals in creating open-source software and hardware continually lowers barriers to entry in terms of the skills and knowledge needed for new people. Included in this are those interested in environmental sensing, primarily for citizen science applications.

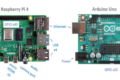
Figure 1. A Raspberry Pi with its many ports (left) alongside a basic Arduino Uno (right). Both are roughly the same size.
Credit: Mark Gahler, CC BY-SA 4.0
Arduino and Raspberry Pi are very different animals. Raspberry Pi is basically a credit card-sized PC that runs a Linux-based operating system. It has most of the same ports as a modern desktop computer and can be easily connected to a monitor, keyboard, Ethernet, etc. It came into being to teach kids programming and to provide them with a general understanding of how computers work.
Arduino, on the other hand, is a family of microcontroller boards that generally have only two ports: one for power and one for programming. A microcontroller is a small computer on a single chip that is used for relatively simple tasks. Your refrigerator, toaster, and TV remote may each have a microcontroller inside managing their respective jobs. Unlike Raspberry Pi, Arduinos and microcontrollers do not have a full operating system; instead, their firmware interprets and runs whatever code they were programmed with without the overhead of an operating system. Arduinos and their derivatives come in a large variety of sizes and capabilities from a variety of vendors. What Arduino and Raspberry Pi have in common, and a major reason for their popularity in maker culture, are their general-purpose input/output (GPIO) pins. These allow for connections to other devices, including sensors, at a lower level than the plug and play we usually expect when connecting something with a USB plug. The number of GPIO pins vary, but generally include some positive voltage pins for power, ground pins, and a set of configurable pins for data communication or for sensing voltages from other devices.
USB itself uses four pins (power, ground, and two for data), and has a widely adopted serial communications protocol. Why doesn’t everything just use USB for the sake of simplicity? One reason is that single GPIO pins can do useful things, like sense a voltage from a thermistor (as an input) or provide a time-varying output voltage to blink an LED. Another reason is that USB is often not appropriate for the job of managing a suite of sensors. For example, the most popular serial protocol for sensors and other devices interacting with Arduinos is known as I2C. It allows for up to 127 devices on a single data bus of two wires. I2C accomplishes this because each device using the protocol has a unique 7-bit address, and the Arduino includes this address when sending a command to a particular sensor so that the other sensors on the bus stay quiet.
Another major reason for the popularity of Arduino and Raspberry Pi is the relative ease of programming. Arduino has a free integrated development environment (IDE) and a fairly comprehensive set of code libraries for nearly any device you can imagine connecting to. The libraries generally take care of the sensor configuration and serial communications details, leaving you with only a few lines of code to write to get the sensor data you want. Generally, if you buy a sensor made to be used in an Arduino, the vendor will direct you to the appropriate library.
The programming language for Arduinos is C++. Python is the primary programming language for Raspberry Pi, which also includes a free IDE. There is some coding skill required, but given the available libraries, tutorials and example code (which most libraries include), it is a lot easier than it used to be.
Adafruit (adafruit.com) is my preferred place for purchasing Arduino compatible devices and most things that end up in my sensor projects. They have created a line of microcontroller main-boards, known as Feather, and plug-in daughter-boards with a large range of capabilities. Additionally, they have put raw sensors and other devices onto small stand-alone printed circuit boards, known as breakout boards, that are easily integrated with the microcontroller. Figure 2 is a small sample of what they build. Although a lot of pins can be seen on those little boards, in most cases only four are needed: power, ground, and a couple for data transfer. The other pins are mostly bells and whistles that most users won’t need.
Soldering is needed to use sensors in this form. Soldered pins and headers are used to join boards, along with jumper wires or traces on a circuit board. However, a trend that I am seeing is for breakout board manufacturers, including Adafruit, to include jacks on some of their boards so the microcontroller and breakout boards can be connected with standardized cables. This eliminates the need for much of the soldering. Another new trend that I have seen lately are knockoffs of the breakout boards showing up on Amazon, which I assume demonstrates the increasing popularity of this form of electronics.
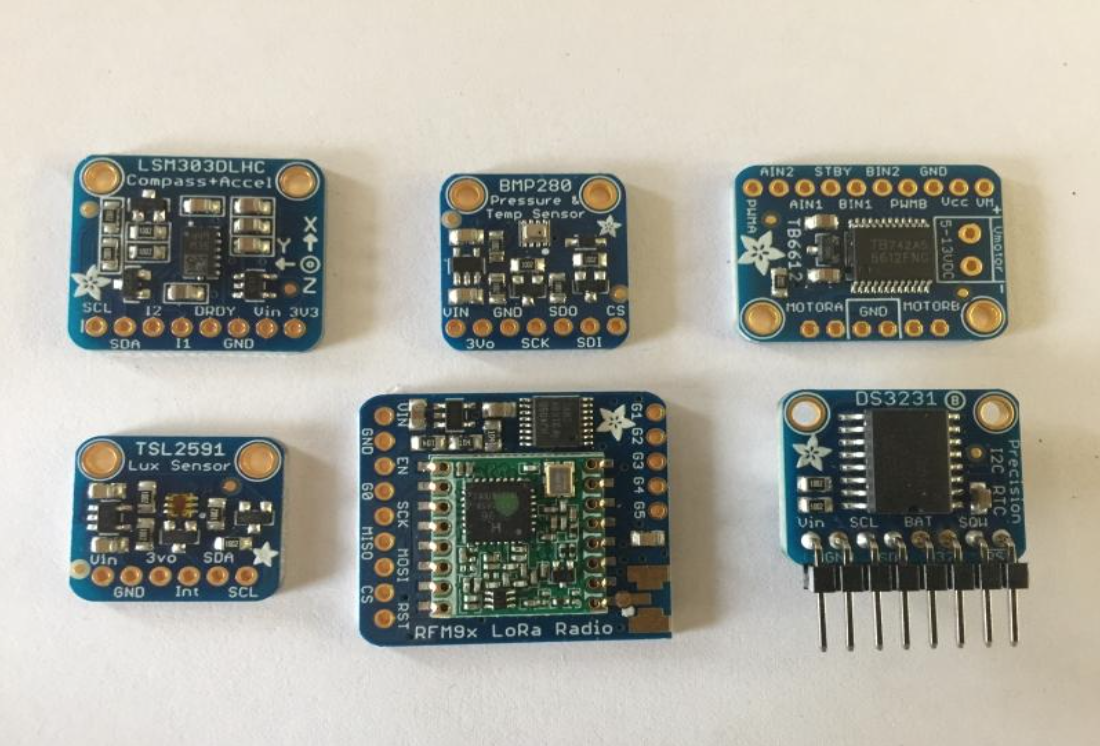
Figure 2. Breakout boards – clockwise from upper left: digital compass & accelerometer, barometric pressure and temperature sensor, DC motor driver, real-time clock used in datalogging, radio transceiver, and light sensor.
Credit: Mark Gahler, CC BY-SA 4.0
“It looks homemade”
I was recently asked whether Arduino hardware can withstand the harsh conditions that environmental sensors need to deal with. Arduino and Raspberry Pi are basic electronics, and will not survive dust, dirt, or water any better than other unprotected electrical equipment. If you can see the electronics, then it is probably not ready to spend a lot of time outside. Creating the packaging to use these electronics outdoors or underwater is a big challenge, and it is where most of my trial and error experiences have come from.
The most common casing material for commercial aquatic sensors is a plastic with the tradename Delrin or Delron, depending on who manufactured it. It encases the electronics and protects them from moisture with a tight-fitting cap and a rubber O-ring. But precision machining of plastic is more than I want to get involved in, even if I had access to a quality lathe. Instead, a pretty good sensor case can be made with plumbing parts available from the hardware store. PVC pipes and end caps can be glued together, and access to the inside of the pipe to retrieve data and change batteries is via a union fitting that joins two open ends of pipe. Wiring to connect sensors outside the pipe is a bit tricky, but all of this can be made watertight with some epoxy, practice, and a strong respect for the sneakiness of water. I spoke to a UCSB grad student at the last All-Scientists’ Meeting who used this setup for his sensors in more than a thousand feet of water in the Pacific Ocean.
The operating temperature of electronics is another very important characteristic. Commercial electronics (home & office applications) are typically expected to operate from 0°C to 70°C, while military electronics, at the other extreme, have a temperature range of -55°C to +125°C. In between are a few other classifications such as industrial and automotive. Back in the day, extreme temperature parts came with a premium price because of their limited application, but the growth of automotive electronics (-40°C to +125°C) in the past couple of decades have made the basic components that go into them inexpensive and ubiquitous. The rest of us have benefited because we use a lot of the same basic parts as the automotive industry.
Basic Arduino boards have an operating temperature range of -40°C to +70°C, which can make them suitable for environment sensing provided that all of the other parts of your system can withstand the temperatures you are working in. In my experience, batteries (especially lithium batteries) are the weak link in below-freezing temperatures. Raspberry Pi has a temperature range of 0°C to +50°C, which is probably not much different than a desktop PC, making it less suitable for environmental sensing in challenging environments.
The pros and cons of DIY sensors
I know a limnologist who has been working on his custom environmental sensor for over five years, and thinks he has a few more years to go. His motivation seems to be freedom from the high cost of specialized commercial sensors, and he plans to publish his creation as open source when it is finished. The cost of commercial sensors has gotten a lot of people interested in looking into do-it-yourself approaches for environmental sensing, but it seems to have been pretty slow in making progress. I think the reason is that the time expenditure for these types of DIY projects is tremendous. Trying to build your own sonde because you’re appalled at the price of a commercial one isn’t really a good reason to get into it unless you already have the needed skills and a lot of spare time.
In my opinion, DIY can pay off in two scenarios: you want to build a large number of simple sensor systems (e.g., temperature loggers) for citizen science or to cover a large spatial area, and/or you want a sensor that no one is making and selling. This latter case is what I’m currently involved in. I am building sensors to automate the measurement of methane ebullition, which is gas bubbling up from a lake bottom, and a separate sensor that measures gas exchange at the air-water interface of a waterbody. Limnologists have been trying to automate both of these measurements for more than a decade, with limited success and mainly in quantities of one or two. The hope is that eventually there will be an accessible design that is simple and straightforward enough that most people can build it without the need for specialized skills.
New open-source field research data collection platforms, such as FieldKit (fieldkit.org), are attempting to provide more affordable environment sensing while minimizing the DIY aspect. We plan to give FieldKit a try at NTL for a couple of new sensor sites. They are worth keeping an eye on.
Finally, if you’re new to electronics and/or programming and want to give it a try without making a big investment, Adafruit sells a little device that includes a lot of sensors, buttons and lights to interact with (https://www.adafruit.com/product/3000). It costs about $20, and Adafruit provides a very detailed tutorial on how to program and use it.