by John Porter, VCR LTER
LoRa (short for Long Range) is a spread-spectrum digital radio technology designed for Internet of Things (IOT) applications. IOT applications typically involve low-cost sensors or control systems that exchange small amounts of data and need to have low operating power requirements. For example, a stress sensor on a bridge might send daily measurements, or a presence sensor might indicate hourly whether a meeting room or classroom is in use. There are an increasing number of IOT sensors and sensor options that have useful scientific applications. For example, a Dragino LHT65 temperature and humidity sensor is rated to send hourly measurements for 10 years using a built-in battery, making it ideal for locations where solar or wind power is unavailable, while still allowing wireless communications. Inexpensive (<$30) LoRa add-ons boards are available for Arduino and other microcontrollers if you want to build your own sensors.
LoRa does have its limitations. “Long-range” in this context means 16 km or less based on the specification, but “or less” can also mean “a lot less.” The 16 km limit is based on a clear line-of-sight, with no obstacles in the way. In urban environments <3 km is expected, and 0.5 to 10 km is a more realistic range across most environments. Increasing the range of a radio signal can be accomplished using more transmitter power (not an option for LoRa if we want to keep it within FCC Part 15 regulations and use minimal power), or use of larger high-gain omni or directional antennas. Many LoRa units are small, with tiny built-in antennas, so their range is more limited. Some have connectors where larger antennas can be connected to extend the range. Elevation can also help. For example, a weather balloon communicating from 38 km high sent data over 700 km using LoRa. In the U.S., LoRa uses frequencies in the 902-915 MHz range. These frequencies are better at penetrating vegetation than WiFi frequencies (2.4 and 5.8 GHz), but vegetation still takes a toll on operating range.
To receive data from LoRa sensors a “gateway” or “hotspot” is required. A gateway receives and sends encrypted signals to the LoRa sensors and takes the received data and sends it across the Internet, typically via a standard WiFi connection. Gateways have higher power requirements than the sensors, because they need to be active at all times (sensors have low-power “sleep” modes) and they need to operate higher-powered WiFi radios.
One interesting feature of LoRa is the existence of LoRaWANs or “Long Range Wide Area Networks.” LoRaWAN allows you to use LoRa sensors without having your own LoRa Gateway and manages handling of transmitted data. LoRaWAN networks allow any gateway in the network to transfer data to and from any sensor in the network, independent of ownership of the gateway. So if you are in an area covered by existing gateways all you need is a $30 LoRa sensor and you are good to go!
One challenge in working with LoRaWAN is not the lack of options, but rather an abundance of options. You need to decide which of the many LoRaWAN networks you want to use—there are more than a dozen of them. These can include the Helium network, AWS IoT Core, The Things Network, LORIOT, ChirpStack and many more. Many of these have a commercial component wherein each message passed from or to a sensor has a small charge associated with it. For example, AWS IOT charges $2.30 for each 1 million LoRaWAN messages 5 kb or less in length (or 0.0023 cents per message). Assuming a sensor sends a message once every 10 minutes for a year (52,560 messages), it would cost about 12 cents for messaging. There are additional charges for transforming binary messages into interpretable data and other services, but again, the per-message cost is minimal. However, with large numbers of sensors (there are expected to be billions of IOT sensors out there) or more frequent reporting, costs need to be considered. Some, such as ChirpStack, are stand-alone. You run them on your computer to serve your sensors.
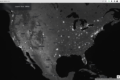
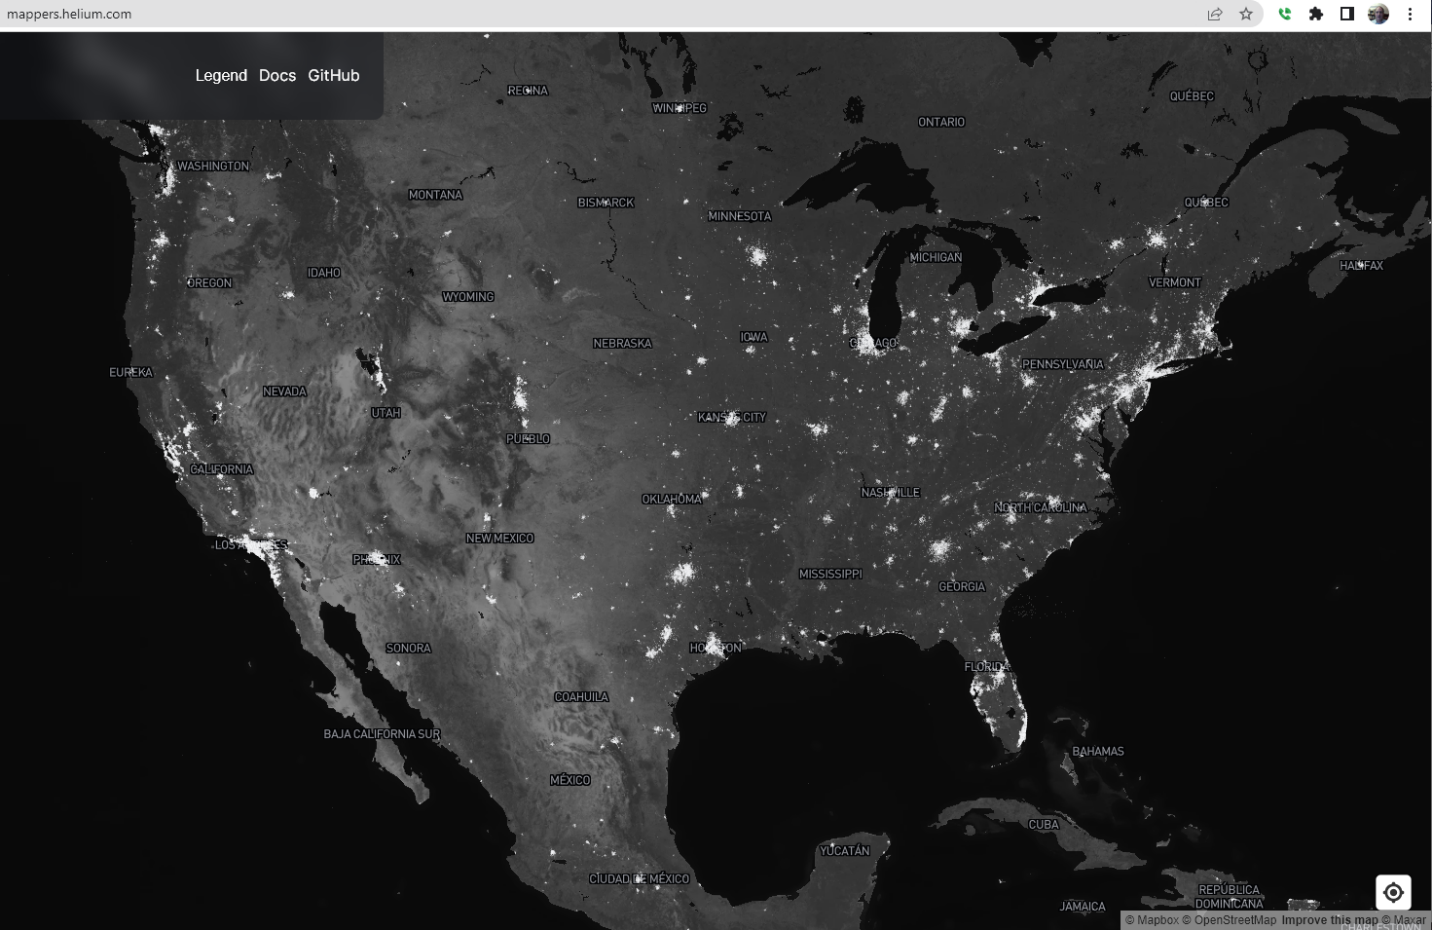
One interesting LoRaWAN is the distributed “Helium” network. To encourage development of their “hotspot” (gateway) network, each hotspot that passes on a message gets a payment in a crypto-currency (HNT). This has led to a run on high-end gateways (the distributed network requires more on-board computing power than a typical gateway) as users rush to deploy “Helium-miners” that rack up cash, just by sitting in a closet receiving messages. As for AWS IoT, the money comes from fees assessed to sensor messaging. The advantage to the sensor user is that this scheme promotes the development of a large robust network where you might not need to provide your own gateway. A look at the Helium map (Figure 1) shows that their coverage in cities is pretty robust, but that HNT returns vary widely, because they depend on the number of devices in range. For most LTER sites in remote locations, I’d expect Helium-miner returns to be fairly low and based primarily on research use.
I chose to do my testing using “The Things Network” (TTN) for several reasons. First, Helium hotspots are more expensive (~$550) and currently hard to find. Second, I wanted to try moving my gateway around to different test locations and the Helium network has a $10 fee associated with moving a hotspot (they charge to update their databases). Third, TTN has a free tier for both gateways and sensors. There are some downsides (data is only retained for 24 hours and there are some limits on the number of messages), but for experimentation, that was acceptable. Fourth, there is a reasonably large network of TTN gateways out there. Finally, my gateway (a Dragino DLOS8N) came with good instructions for that network. As for all the networks, TTN is a work in progress, with many innovations and tweaks being added, including commercial options (The Things Stack and The Things Industries).
Getting a gateway connected to the network is moderately technical. It was mainly an issue of signing up for a TTN account, establishing an “application” configuring my gateway to use TTN and exchanging device identification numbers. Adding sensors is easier, since you only need to register the sensor ID with the LoRaWAN network server. Suffice it to say that with good instructions it can be done! Interestingly, many of the LoRa sensors can be configured using “AT” commands similar to those used on the old modems we used in the early days of the Internet (and before). Some configuration options (e.g., sampling interval) can be sent using an upload via the LoRaWAN network and so made while the sensor is deployed.
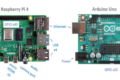
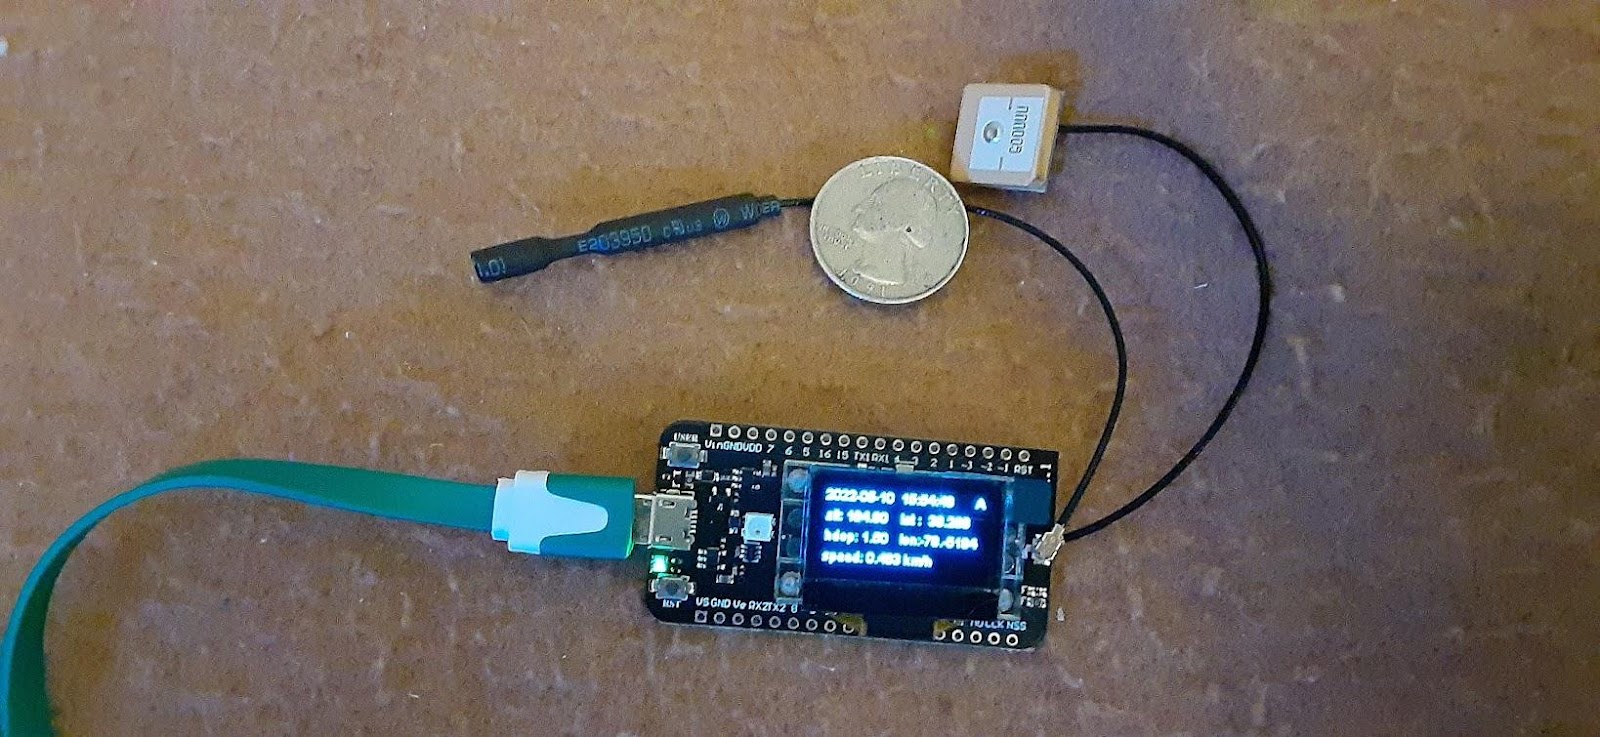
There are a very wide range of sensors and sensor platforms available for LoRa (e.g., https://www.thethingsnetwork.org/device-repository/ ). Some are development boards, designed to be customized such as the Heltec HTCC-ABO2S CubeCell GPS sensor in Figure 2. This board is programmable (using the Arduino IDE) and has analog and digital inputs, as well as the built-in GPS and display, so that additional sensors can be attached. Similarly, add-ons for microprocessor-based sensor platforms such as Arduinos and Raspberry Pi’s are available to add LoRa capabilities to existing devices.
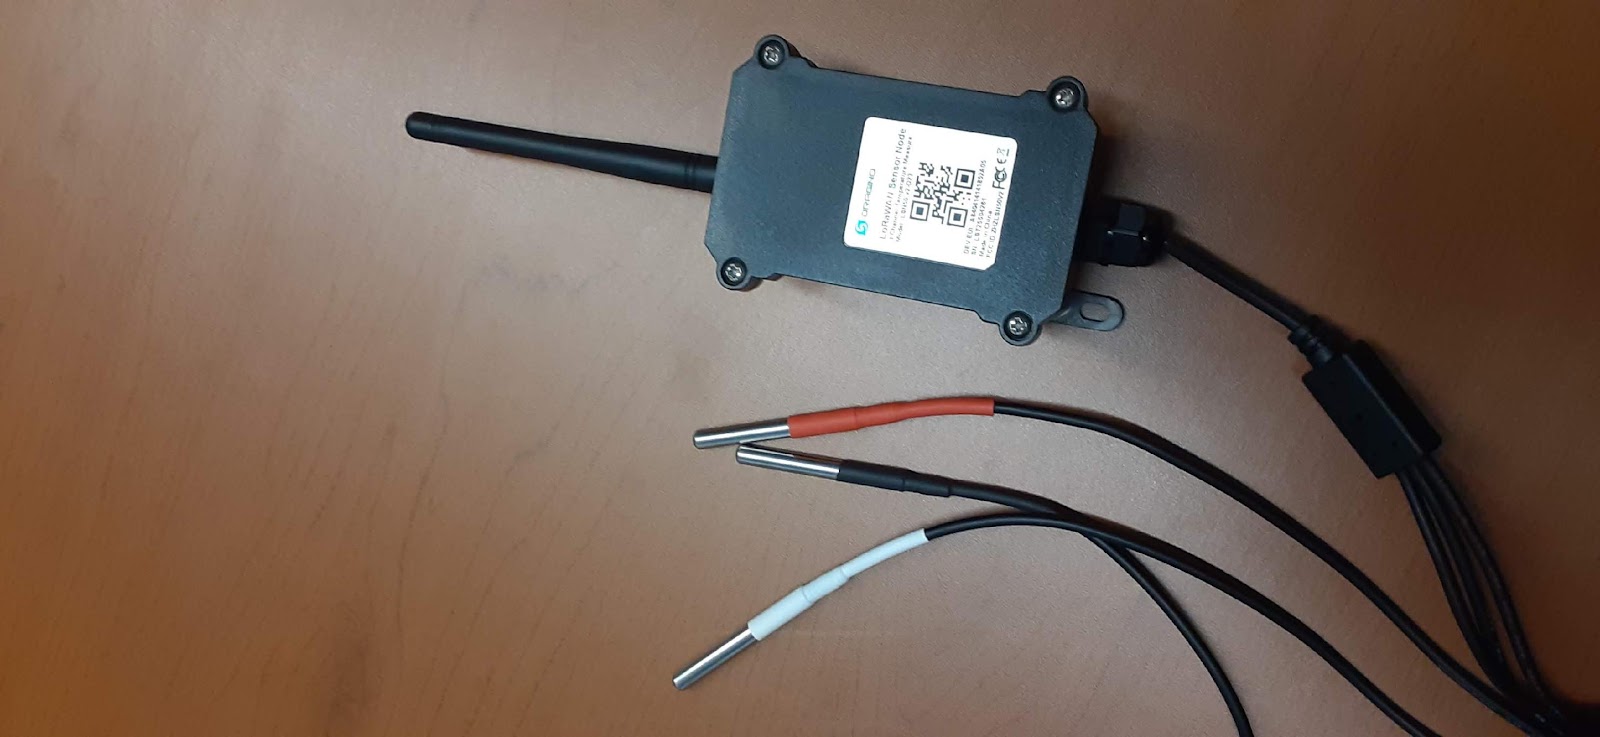
Other sensors are more “turnkey,” already programmed and housed. For example, the Dragino LSN50v2-D23 sensor provides three waterproof digital temperature sensors and is enclosed in a weatherproof box equipped with an external antenna (Figure 3). Just open the box to place a jumper on the enclosed board to power it up and add its ID information to your LoRaWAN network server, and you are ready to go. Some customization, such as setting data collection frequency, can be done over the LoRaWAN network by sending a binary string (e.g., 01000E10, which sets the sampling interval to 0E 10 seconds, or one hour) from the network server.
For testing, I started with a Dragino LHT65 sensor that cost ~$50. It has an internal antenna, so limited range is expected. I set up my gateway at home (about 1.5 km from my office) with the small external antenna near ground level. The LHT65 sensor, not surprisingly, was able to send data from anywhere around the house or yard. I took the sensor into my office and was surprised to find that the sensor was still reporting data despite my office facing away from my home, a very small sensor antenna, and a suboptimal gateway location. My surprise disappeared when I realized that the sensor wasn’t actually communicating with my gateway. Another TTN gateway in the Engineering School about 300 meters away had picked up the data signal and sent it on, thus demonstrating the value of LoRaWAN over just LoRa. I will be using a GPS-equipped tracking sensor to test out how effective LoRa will be in reaching our remote field sites in the coming months.
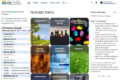
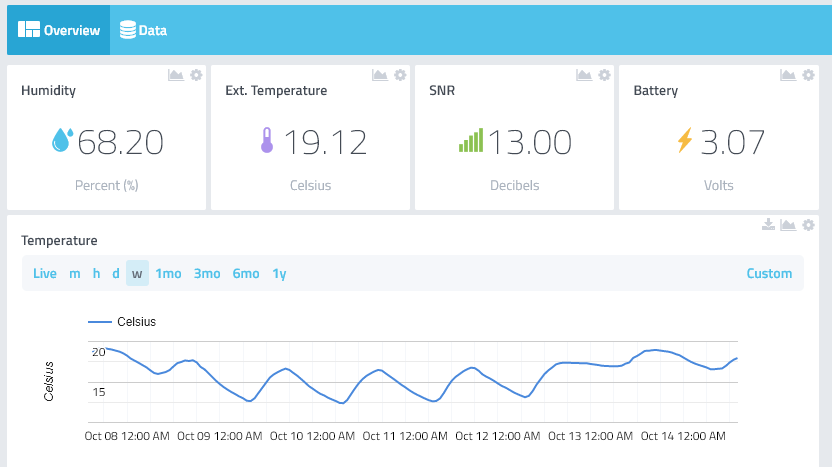
After the data is returned to the LoRaWAN network server, you’ll probably want to get a copy of it to your server, especially since most network servers retain data for a limited time. The actual data returned is in a binary format, so a JavaScript decoder (often provided with the sensor) reformats the data as a JSON snippet. Then for downloading the JSON, I’ve been using MQTT, a protocol for retrieving messages programmatically. The specific tool I’ve been using under Ubuntu Linux is called mosquitto_sub and it downloads each message as a JSON snippet in real time, which I then append to a file of messages. This is fairly arcane but works OK for data retrieval. If you want to get fancier there are also a variety of “cloud integrations” that interface with TTN to provide more attractive data displays (Figure 4) to a variety of devices, including cell phones. As with network selection, there are many options here as well such as DataCake, Cayenne, Azure IoT Hub, AnyViz, IoT in a Box and many others. Many of these are fee-based, but have free introductory accounts so you can test things out on a limited number of sensors or with a limited set of features.
LoRaWAN is not the only approach to using LoRa. Stand-alone and mesh configurations may be better under some research conditions. LoRa has been around for several years now as a development environment, but is now approaching the level of maturity where it can be reasonably deployed for data collection or remote-control operations without a high degree of technical expertise. It doesn’t solve all data retrieval challenges, because it is still fairly limited in range and is restricted to small data “payloads.” However, for some ecological research applications it may be ideal for providing real-time data.