The author, John Porter, is a veteran information manager at the Virginia Coast Reserve LTER. In this article, he describes the process he used to implement Amazon Web Services for off-off-site data backup.
Until recently, the University of Virginia (UVA) operated an off-site tape robot located at Virginia Tech that I used for off-site backups. Our servers backup daily to a local disk appliance in a different building at UVA that should make the backups safe from most routine threats (e.g., theft, fire). But what about exceptional disasters such as earthquakes that would affect the UVA grounds as a whole? That is where an off-off-site backup comes in. The UVA tape robot fulfilled that role for us for the last decade, maintaining redundant copies totaling about 5 TB. However, the robot hardware and software are becoming unreliable and UVA does not plan to replace it, at least for non-administrative users.
Many options, some affordable
Credit: John Porter. CC0
Establishing identities
So what was the process? The first step was to set up an AWS account with a way to pay for it. Fortunately, UVA has a contract with a reseller/bundler that allows me to use a purchase order, rather than a credit card to pay for AWS. Once I had that, I now had login credentials for an AWS account. But my first step was to create additional logins using the AWS Identity Account Management (IAM) system. Why? First, it is recommended by Amazon that you do so, but more importantly it lets you limit accounts to particular functions. So I could set up an identity that would be limited to interacting with S3 for my storage needs; if somehow those account credentials were compromised, the interloper couldn’t use them to spin up expensive servers in Amazon’s cloud computing arm. IAM identities can be authenticated either using passwords, with optional multi-factor authorization, or using a pair of “keys” (long numbers) for use by automated processes.
Once suitable identities were established, it was time to decide how to interface with AWS. The easy way is the web-based “S3 Management Console.” This provides point-and-click methods for establishing “buckets”, the basic storage unit in AWS’s object storage system, and folders within them. Files to be archived can be dragged and dropped into the interface for easy uploads of small files. Alternatively, there are APIs and software development kits for a variety of computer languages, including JAVA, C, and PHP. Finally, there is the AWS Command Line Interface (CLI). For my purposes, I chose a hybrid solution. I set up buckets and folders to receive my uploaded files using the “S3 Management Console,” but use the CLI on a Linux server to do the actual file copying. The advantage to using the CLI is that I can store the commands I need as a simple shell-script which can be run automatically.
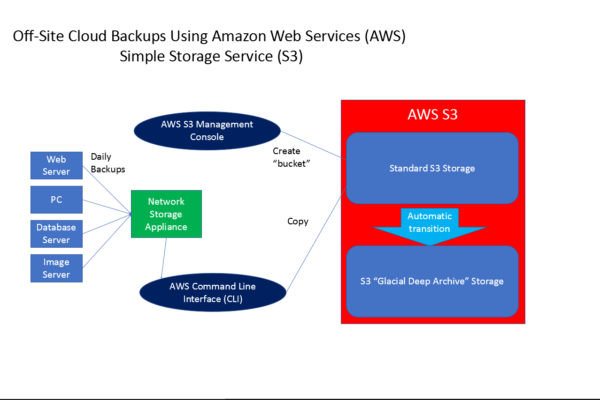
Figure 1: Flow chart for the process of storing data in the Amazon Web Services (AWS) Simple Storage
System (S3).
Credit: John Porter. CC0
The nuts and bolts
To use the CLI on my Ubuntu server, I first needed to install it using sudo apt install awscli, then run the command: aws configure to generate prompts for the input of the authentication keys generated by IAM. These keys are then saved, so it is not necessary to enter them again. The actual commands for copying the backup files over are very simple – essentially a subset of typical Linux commands such as cp, rm, ls, etc. The one difference is that S3 resources are addressed using a URL-like path as in s3://mybucketname/myfolder1/myfile1.txt. This refers to myfile.txt in the myfolder1 folder, stored in bucket mybucketname.
To do my copying of backups I use a command: aws cp mylocaldirectory s3://mybucket/backups –recursive, which copies all the files and subdirectories in my local directory to a backups folder on S3. Note that this copies the data to the “standard” (and more expensive) S3 storage-class. I would have liked to have the option –storage-class DEEP_ARCHIVE, but the older CLI client for Ubuntu does not yet support that option. So as a work around, using the web interface, I set up a “lifecycle policy” for mybucket that includes a “transition” dictating that after 1 day in normal S3 storage (at higher S3 pricing), each file/object is to be moved to the “Glacier Deep Archive” storage (Figure 1). That way, data is automatically transitioned to the cheaper storage-class without any additional intervention on my part. This also gives me one last chance to delete any files that were inadvertently uploaded before they transition to Glacier Deep Archive.
If I need to retrieve the files (which I hope I never have to do, since it would imply very large problems back at UVA), I would use the web-based “S3 Management Console” to retrieve the files. This would entail some additional network costs for downloading the data, but that would probably be the least of my problems!
Mileage may vary
There are a few additional things to note. First, although I do local backups daily, I don’t update these “last chance” backups frequently. I typically do backups to AWS bi-monthly, and delete obsoleted copies, so that at any given time I just have three backups within the 180-day minimum storage time window. If I did them every day, it would be better to use one of the other storage-classes without that minimum storage-time window. Second, my backups consist of relatively few, very large files. If my backups consisted of huge numbers of small files, the costs for metadata storage (each file, even in Glacial Deep Archive, has some metadata saved in the “standard” S3 storage class) would become important.
Needless to say, I haven’t scratched the surface of all that AWS, or even S3, can do or be used for. Virtual tape drives, linking S3 to cloud computers, and programmatic use are just a few of the options designed to meet as many business use-cases as AWS can identify. There is plenty of help available on the AWS web site, with tutorials and videos galore. However, for the new user, the need to understand IAM, S3 and its diverse storage classes and the numerous options for interacting with AWS, can be challenging and intimidating. However, it is not necessary to master it all, or even a significant subset, to provide secure off-off-site backups in the cloud using AWS. AWS offers a limited free account to explore different AWS options.
—John Porter, VCR LTER, http://orcid.org/0000-0003-3118-5784